Choose the right size and style
When choosing false eyelashes, it is common to have questions about the right size and style. This choice will depend largely on your personal taste and the type of makeup you want to create.
How to choose the size and style of false eyelashes?
I’ll tell you all the details about each model so you can choose your favorite.
Striking look with voluminous lashes: If you choose to go all out and want to create a striking look, invest in false lashes that guarantee maximum volume. This model has a triple layer of fine, long synthetic bristles and a reinforced, flexible base that prevents the lashes from coming loose and allows for easy application.
Sexy look with volume and definition: If you want to create a sensual and attractive look with false eyelashes, the best choice is a model that has three layers of fine, long synthetic bristles and a flexible base that makes application easy.
Natural look with well-defined lashes: To create a more natural look (highly recommended for everyday makeup), go for well-defined false lashes that are not much longer than your natural lashes. In addition, you can apply them to the outer corner of the eye to achieve a more slanted look.
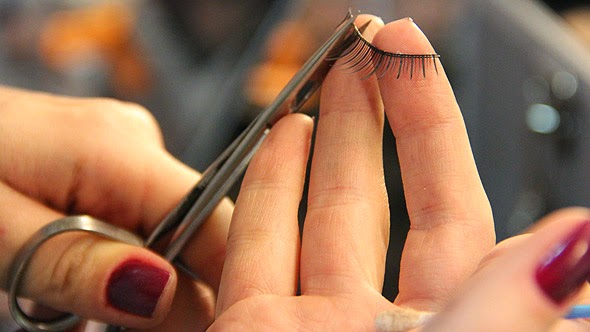
Measure your eyelashes before you start
When buying traditional false eyelashes, you will notice that they come in a standard size that is not always the same as your natural eyelashes. That is why you should have your false eyelashes custom-made to fit your eyes perfectly and match the type of makeup you want to create.
How to get false eyelashes just right?
A very important tip is to start the process by measuring your natural eyelashes and the contour of your eyes, comparing them with the false eyelashes. The eyelashes that will be applied to the outer corner of the eye should be larger and longer.
For the inner corner, the false eyelashes should be smaller and shorter so that they do not interfere with the movement of your eyes. This technique will also give you a more natural look.
If you find that you need to cut the false eyelashes, use small scissors or nail clippers that are clean and sterilized. Cut little by little in sections and hold them up to your eye to compare. It is very important to be patient during this part of the process so that you don’t end up cutting too much.
Use an eyelash curler on your natural lashes
Using an eyelash curler is an essential step, especially if you have straight lashes. Using an eyelash curler will ensure that your natural and false lashes have the same curl, guaranteeing a natural and uniform look.
You should use the eyelash curler before applying mascara.
How to use an eyelash curler?
Using an eyelash curler is easier than you think. Just follow these simple steps:
Step 1: Make sure your eyelashes are clean and free of any other product residue. Mascara should never be used before curling, as it can damage your eyelashes.
Step 2: Use your fingers to lift your eyelid for better access to your lashes.
Step 3: To create a natural effect, position the curler close to your lashes, but remember not to pinch the tips of your lashes and end up creating a marked effect. Also, be very careful when clamping so as not to risk pinching the skin.
Step 4: Press the curler and count to 10 before releasing. Done! Very easy, right?
Learn the best way to apply false eyelashes
First of all, you need to choose the right glue. There are several options on the market, but it is best to opt for transparent glue. It ensures a much more natural finish and does not run the risk of creating an obvious smudge. Therefore, it is perfect for beginners.
Black glue can also be used, but it is more recommended if you are creating a smoky eye or a well-defined eyeliner. It will give your makeup a more professional look, so it is best to use it only if you have a little more experience.
How to apply glue to false eyelashes?
Now that you’ve chosen the perfect eyelash glue, it’s time to apply the glue to your eyelashes. This process is very simple, it just requires a little attention and practice.
Step 1: Apply a small amount of glue close to your eyelid. Make sure the glue is applied close to the root of your natural eyelashes. Be very careful with the amount and do not let the product touch your eyes.
Step 2: Let it dry for about 30 seconds. You should not try to apply the false eyelashes before this time.
Step 3: While the glue is drying, apply it directly to the false eyelashes. It is very important that the glue only touches the base of the eyelashes and not their length.
Step 4: Only after waiting the necessary time can you proceed with the application.
Use tweezers to apply false eyelashes
It is common to see many people using their fingers to apply false eyelashes, but if you don’t have much experience, this is not the best choice. Instead, use tweezers, which will give you a much clearer view so you can stick the eyelashes in the right place.
How to apply false eyelashes?
This is the moment everyone dreads, but believe it or not, it’s the easiest part! You’ve already gone through the most complex stages of the process, now just apply the false eyelashes by following these steps:
Step 1: Using tweezers, hold the false eyelashes that have already been measured and cut. Remember to hold them by the length and not the base, avoiding the area where the glue has been applied.
Step 2: Start with the lashes in the center and then move to the sides. Take your time and apply one tuft at a time.
Step 3: Apply the lashes from top to bottom and not from the front of the eye. It is essential that you position the false lashes close to the root of your natural lashes.
Step 4: Make sure the ends of the lashes are securely attached. Do this very gently using tweezers.
Step 5: Blink a few times to make sure you can move comfortably. If everything is fine, repeat the process on the other eye.
Apply mascara to finish
To finish, apply mascara. This will blend your natural lashes with the false ones, creating a beautiful, harmonious look. It will look super natural, just the way we want it.
How to apply mascara correctly?
Applying mascara is as simple as you imagine. In this step-by-step guide, I will teach you the perfect technique that professionals use:
Step 1: To ensure that the product does not smudge, remove any excess product from the brush as soon as you open the package.
Step 2: Place the bristles of the brush very close to the root of the upper lashes. Then, rotate the brush and pull toward the tips of the lashes.
If you want a more natural look, make zigzag movements only at the root of the lashes.
Step 3: For the lower lashes, apply only if you want to open up your eyes. In this area, make sure that all excess product has been removed from the brush. Apply very carefully so as not to smudge and without overdoing it.
Step 4: If the product has smudged, don’t despair. Only after the product is dry, use a cotton swab to clean it up.